Just a warning: If you do not feel comfortable with the command prompt, double boots and partitions, you may not want to try this method. While it is safe, I would recommend having someone who is familiar with these procedures to perform this restoration.
Here's how to update the boot sector code:
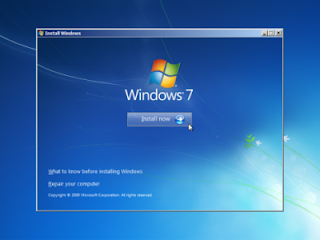
Boot from the Windows 7 DVD or image and follow the prompts until you reach the option to repair the equipment.
You are prompted to the Windows installation you would like to retrieve. Select the option to use the repair tools that can help solve problems starting Windows. Select the appropriate installation and click Next.
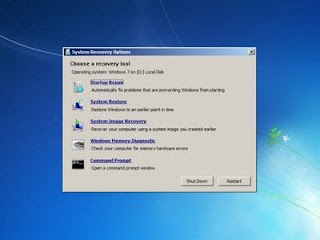
The following screen will include the following repair options. Normally you can only select Startup Repair and Windows does the rest and take care of everything automatically. I always try this first option before delving into the command line. However, if the Startup Repair does not work in your installation, you can select the command prompt and continue.
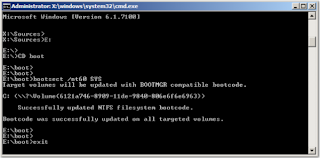
We will need to access the CD Drive, so type the appropriate drive letter (e.g. E:) at the X:\Sources=> prompt, then hit Enter.
Now, with the E:\ prompt up, we need to switch to the boot prompt, so type CD Boot.
The Prompt should change to E:\boot>. Type bootsect /nt60 SYS (there should be a space between bootsect and the ‘/’) then hit Enter.
You should receive a message that the ‘Bootcode was successfully updated on all targeted volumes’.
Type exit to return to the recovery options window and Restart or Shutdown.
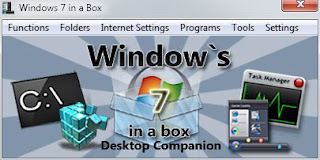
After a quick glance around Windows 7 In A Box, it does seem to have most Windows 7 Settings covered, but I’m not sure whether having so many long lists makes it easier for users to find the setting that they want. If you’re looking for specifically to tweak Windows 7 then maybe one of these Windows 7 tweakers may suit you better.
How is Blue Ray supported today?
- H.264 otherwise known as MPEG-4 Part 10.
- VC-1 a video codec that has was implemented by Microsoft in Windows Media Video 9 (WMV)
These codecs are largely available to other software, but are not part of the Windows 7 media player.
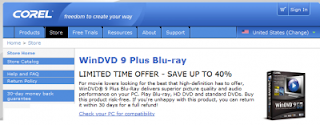
Nevertheless, there are other codecs that can be used that will allow media and audio to be played on the Windows media center. They allow movies, tv recordings, and audio to be played from a blue-ray disk. Here are three such options.
- Windows Media Player Plugins. There are three that can be used.
- Plugins which are utilities add or extend the built-in functionality of Windows Media Player.
- Skins which are Small programs that change the appearance of Windows Media Player.
- Visualizations allow you to view Windows Media Player in different way, but allowing you to listen to music and so on.
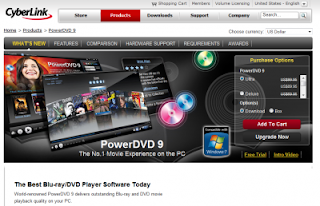
3. Cyberlink Powerdvd 9.
If you want to add the codecs, how can you tell what codecs are running on Windows 7 Media player? You can get this information from the sechnical support information window.
Start with the following: Open the Windows 7 Media Icon
Support:
Microsoft:
http://www.microsoft.com/windows/windowsmedia/player/plugins.aspx
Skins: http://www.microsoft.com/windows/windowsmedia/player/skins.aspx
Visualizations: http://www.microsoft.com/windows/windowsmedia/player/visualizations.aspx
Plug-ins: http://www.microsoft.com/windows/windowsmedia/player/plugins.aspx
Corel:
http://store.corel.com/webapp/wcs/stores/servlet/ProductDisplay?partNumber=OL_WD09PLBD&srcid=&pculicenseid=&promocode=0&trkid=CJ&countryCode=US&storeId=10302&catalogId=10103&langId=-1
Cyberlink:
http://www.cyberlink.com/
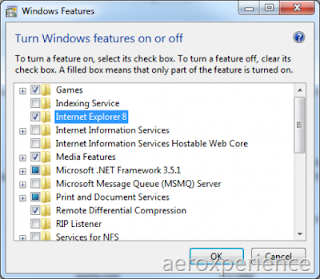
The guys over at AeroXperience seem to have discovered that Microsoft is indeed offering an option to remove Internet Explorer 8 from the Windows 7 operating system. To be precise: The option to remove Internet Explorer 8 has been found in Windows 7 build 7048. It was not there in the beta release of Windows 7 which seems to suggest that Microsoft is working on a way to comply with the European Union in the matter.
It should also be noted that uninstalling Internet Explorer 8 from the Windows 7 installation will not remove all of its components from the computer system. Microsoft has integrated Internet Explorer into the Windows operating system that it would practically require a full rewrite to get rid of it completely.
Only the actual Internet Explorer executable will be removed from the Windows 7 build if the option to remove Internet Explorer 8 is selected. Here are the steps to undertake to remove Internet Explorer from Windows 7:
- Enter the Control Panel and look at “All Control Panel Options”
- Click “Programs and Features”
- In the left sidebar, click “Turn Windows Features On or Off” (you will be thrown a UAC prompt if you elevated UAC)
- Wait for the list to load.
- Look for Internet Explorer 8 in the list and uncheck it.
- Click OK. You will see a prompt notifying you of a reboot.
- The machine will reboot once, configure things, and reboot again.
There is no word yet if the uninstallation of Internet Explorer in Windows 7 affects any other areas of the operating system. Several components but also third party tools use the rendering engine of Internet Explorer.
As we've mentioned in the past, BumpTop isn't a new OS or shell replacement, it just adds a 3D workspace to your desktop. The $30 mulit-touch version of the software is available now, but you'll need to have Windows 7 (and a multi-touch tablet, laptop or all-in-one PC). The good news: we're going to see a bunch of those arrive alongside the new OS on October 22.
To be granted the logo, the products are tested to work with all versions of Windows 7, including 64-bit. This is an important change since the 64-bit systems are becoming more common
This is a very important change for us all, and seal the deal on 64-bit Windows is progressing successfully.
They also say they have made it easier and cheaper for a product to be certified. This will also help with the driver's signature, though obviously not yet say by how much an OEM device.
To see what companies are working with Microsoft on the logo testing program of the new website, ReadySet7 has all the details you need.
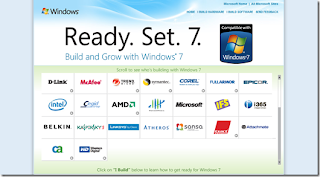
The Windows Logo testing is important both for the end user and to ensure the future of the operating system. Most blue screens traditionally have been caused by unstable drivers. Logo testing minimizes the risk of a driver of instability, creating a happier experience for the user and less negative publicity for Microsoft.
When it comes to identify and use the program logo Microsoft Hardware said ...
- It is very easy to identify products that are for Windows 7. The logo will appear on packaging and retail websites
- Products carrying the logo will work perfectly. For example, a digital camera to automatically transfer pictures or a wireless router easily be created in minutes and can add a wireless device in Windows 7, which has received the logo in seconds.
- Software is installed without worry. Applications and drivers are signed so that you know that the file has not been tampered with and can trust that no malware or spyware.
One thing of note is that this time there is a single logo. With Windows Vista there are two, compatible with Windows Vista and Vista Capable. These two logos were misleading and caused great confusion. It's nice to see a clearer, simpler approach this time
I'll be direct. Although love and Windows technology, Microsoft usually am disappointed in the products they produce, although I have to work with them daily. Beyond Windows 7, XP, and the MSN protocol, which tend to avoid Microsoft products. However, Microsoft Security Fundamentals (MSE) is an excellent example of Microsoft's recent moves in the right direction (with Windows 7). MSE is a solid, powerful product that the needs of every user of Windows, and has helped restore my faith in the giant from Redmond, even took me to replace my security suite (ESET Smart Security) with SSM (I thought about going without a full set of I can handle any threats to myself, but decided to keep MSE for the reasons stated in this article).
Firstly, I'm not a big fan of bloat. I was pleasantly surprised to see that MSE weighs in at a mere 4,28 MB installer. After installation, the folder for MSE also was only 10.8 MB, a very slight considering that this is a fully featured control antivirus solution. Then after I found MSE, for the first time is immediately updated definitions (which was very fast) and began to scan (I was already smiling). The default scan was based verification of%% windir% WINDIR% \ System, and the My Documents folder, but that explored my entire disk, and also lasted for all of three minutes.
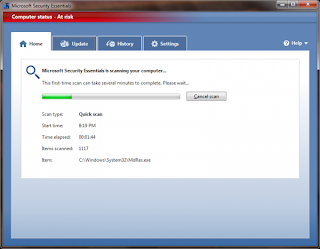
I quickly browsed through the settings and set the entire program to the way I want it in five minutes. If the download took a minute and the installation was a minute (in fact, much shorter), then a reasonable team, should average approximately ten minutes or less for an entire setup. Not bad, Microsoft.
Now, in the characteristics and not my personal experience:
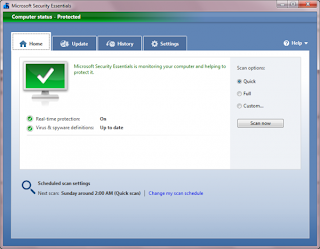
Main Menu (10 of 10)
The main welcome page is very simple and basic (but not in a bad way). In fact, when I first saw the home page, I realized that this was a first for Microsoft. They contain features that the average user is not used, is clean, simple and easy to understand. "Microsoft Security Essentials is the supervision of your team and helping to protect" can be understood by anyone, even the most unknowledgeable users. There were only three things you can do: change my type of scan, change the next time of exploration, and pull to a different window. Nice. An anti-virus should not be flashy and over the top, however, that should do the work and be simple enough for anyone to understand, Microsoft finally made in this regard.
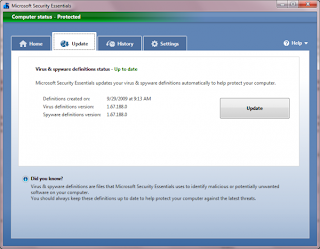
Update Menu (9 of 10)
The update page was hard to judge. He continued in the same line from the main menu, but even more extreme, perhaps a little too much this time. I took off a point because I thought that the MSE should provide an option to check for updates at certain times (like 03:00, my favorite time of inactivity). Beyond that, the same applies to the update page, except that it has a "Did You Know!" Feature. Interesting, especially considering that explains exactly what the definitions are (something an average user may not know).
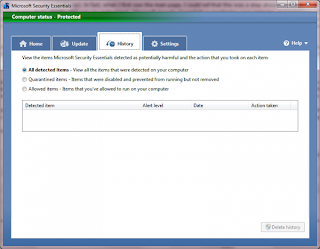
History Menu (10 of 10)
Assuming that this menu lets you reverse the steps taken by the MSE, give her a 10. However, it was found malware on my machine, so I was not really a test subject, so I assumed that MSE will allow a file back to normal for this page. If not, then please consider the classification of a 7 (no program is perfect, all protection solutions should have this option).
Beyond that, only good things can be said. The three filters provided by Microsoft every one has an explanation, once again to test the program as a rookie as possible (always a good thing). Would have been nice if we find something, however, to see the options provided (would be a good thing, but a bad thing at once).
Settings Menu (12 Out of 10)
The settings section really blew me away and finished up this article. Not only was the entire frontend ridiculously easy to understand and manipulate, the settings contained a description of every option and didn’t attempt to hide anything from the user. Not much can be said, except for a pat on the back to Microsoft. I was completely blown away.
Finish
Not originally wanted to write an opinion on MSE as I was sure it would be quite sarcastic, but I was pleasantly surprised. Microsoft has shown that it remains a powerful competitor in a growing market that can still provide users with exactly what they need. The software giant is bending strength, and actually flew some of the competition, all we need now are some data comparing the anti-malware products and see how MSE batteries up some competition. We know that is gained in terms of usability, the only question remaining is whether the motor can also be more astute than others.
Meanwhile, let me again congratulate Microsoft for a job well done. This is one of very few proprietary products that I like and can recommend it to each reader to download it and give it a try.
- Displays the playback status and progress in the bottom of the icon bar icon task.
- Use icon on the taskbar to display a "VU meter".
- Displays the playback status overlay using the icon in the icon on the taskbar.
- Customize the image of aerodynamic peek - Logo Winamp, album art, personalized information on the current media set and custom image file.
- Add control buttons on the thumbnail player aerodynamic look.
- Add the media playing into the category of "recent" in the skip list.
- Winamp is now easier to find in 3DFlip.
- Allows you to enable, disable or customize the plug-in features
Win7shell is available for free download.
Similar to Windows Vista, Windows 7 has a built in utility to partition a hard disk. Many people like to partition their hard drive for several reasons. To boot from a different operating system (This is not necessary anymore if you have Windows 7 Ultimate, which supports booting from a VHD, see here) or to help you manage, where you store files and programs, etc. .... especially if you have a large hard disk.
- Go to Start -> Right Click My Computer -> Manage

- You will then be brought to the Computer Management Program

- Click on the Storage bar and under it click on Disk Management

- Then select the Drive you want to partition, In this example I will select the Drive D: “Vista”

- Now right click on the drive and select Shrink Volume
- Then be presented with a window that shows the size of the hard drive and the total amount available to decrease. Since my drive is pretty full I have a smaller amount available Shrink.Enter the amount you would like to reduce the size (This is the partition size again) Can not more than the amount available to you and remember that approximately 1000 MB = 1 GB.

- After entering values, click the contract and let it do what it is. Depending on the size of the unit and to reduce the amount it could take some time. Be patient and once you have made will be unallocated space that is the only small volume. Select it and then right click and select New Simple Volume.

- Follow the Wizard that appears and fill in the Size of the Partition, Generally the size you just shrunk the drive by.
- Assign a drive letter, choose one of their choice does not make a difference.
- Then on the Format page, Ensure NTFS is selected and then Enter a name for your Drive – ie. “Music” and click next followed by finish.

Here are some of Windows 7 Features:
Aero Peek shows you even more
Aero Peek, the well-received feature in Windows 7 beta that shows the desktop when you hover over the right edge of the toolbar, has been added to the program-switching hot key Alt+Tab.
More power to the taskbar
Right-click on programs pinned to the taskbar and you get a slick menu of options, including recently opened files associated with the program. New in the Windows 7 RC: hold down shift when you right-click and you'll get a standard Windows context menu--perfect for opening a file with a different app.
Hide your icons and widgets
Staying on the desktop for one more feature, users can now toggle viewing their desktop icons and their desktop widgets through a context menu. Right-click on the desktop and go to View, and the last two choices will let you hide either icons, widgets, or both.
Stream your media
Microsoft reinvigorates the Windows Media Player by allowing users to stream their media files to themselves. All it takes is two Windows 7 computers, an Internet connection, and a free Windows Live ID.
Media Player goes small with style
The new minimode for the Windows Media Player looks slick, with an emphasis on album art and big buttons. When the Media Player is running, the Taskbar preview pane displays basic controls, too.
The majority of hardware and devices are compatible with Windows 7. But what about that lovely old document scanner that you are using since you bought it ten years ago? What about other hardware and devices that you want to use under Windows 7? One solution to find out would be to install Windows 7 and see if it works. That’s not always practicable especially in company environments.
A better solution is the Windows 7 Hardware Compatibility List that is being offered by Microsoft. The list can only be viewed with Microsoft’s Internet Explorer but that’s the only restriction here.
Microsoft has re-purposed the website to “display a comprehensive list of hardware products logo’d for Windows”.
Welcome to the Windows Logo’d Products List updated for Windows 7. This site (formerly known as the ‘Windows Vista Hardware Compatibility List’ or ‘HCL’) has been repurposed to display a comprehensive list of hardware products logo’d for Windows – from components to input devices, peripherals to mobile devices and everything in between.* Use the new Windows 7 tab to confirm Windows 7 Status, or even download a Logo Verification report. Use the Windows Vista and Windows XP tabs to quickly discover products logo’d for these respective logos.
A device or hardware with the Windows 7 logo has passed Microsoft’s 32-bit and 64-bit compatibility tests in Windows 7. What this means is that users will find many hardware devices and gadgets in the hardware compatibility list but not all of them as vendors need to submit their products to the Windows Quality Online Services team for review.
It is possible to browse various categories and subcategories like digital cameras & video, networking or printer & scanners. Categories are divided into a device section and systems section. The systems section contains lists of netbooks, notebooks, PCs and motherboards while every other hardware device is found in the devices section of the site.
A search is provided to quickly locate a device without having to browse the categories manually. Interested users who want to verify that their hardware is compatible with Windows 7 can point their Internet Explorer to the Windows Logo’d Product Lists website.
This is a WHQL-certified driver for GeForce 6, 7, 8, 9, 100, and 200-series desktop GPUs and ION GPUs. Release 190 adds support for OpenGL 3.1 and support for CUDA 2.3 for improved performance in GPU computing applications.
What's new in this version:
Release 190.62 is optimized for the latest PhysX gaming titles: Batman: Arkham Asylum and Darkest of Days. It also installs PhysX System Software version 9.09.0814. see all new featuresFrom NVIDIA :
Microsoft has announced two Windows 7 Beta exams that interested users can register for. Public registration started on September 14 and the beta exams period runs from September 21, 2009– October 16, 2009. Not every user registering for the exams will receive a seat and it is recommended to register as soon as possible as seats are awarded on a first-come-first-served basis. The two available Windows 7 beta exams are:
Beta Exam 71-686: PRO: Windows 7, Enterprise Desktop Administrator
Beta Exam 71-685: PRO: Windows 7, Enterprise Desktop Support Technician
Just click on the link above to be taken to the website containing information about the registration process. The exams can be taken at no charge and registered users have four hours to complete them.
Microsoft has also released exam preparation information which can be accessed for 71-685 and 71-686. These give information about the skills that will be measure in the exams and preparation tools and resources.
What is speech recognition?
Just as the keyboard lets you enter commands into the computer and mouse to change the location where you deliberately want to write or launch a file, the language is a new dimension of interface control that focus on the commands, not the location.
What if an application does not present "commands"? It can still be controlled by overlapping numbers above the interface, control of geography. To activate a function simply speak the number. A mousegrid can be used to move the mouse on the appropriate network location. The network has nine areas, and when you select an area creates the mouse is moved to the area, and a network of nine new areas. He spoke in the number of new and repeats the process until the mouse is placed in the right place.
Using voice recognition
Before you can use the speech, there are some things you should do. Unlike keyboards and mice, where the finger pressure becomes a constant pressure-mail, voice has variations. So the software must be trained.
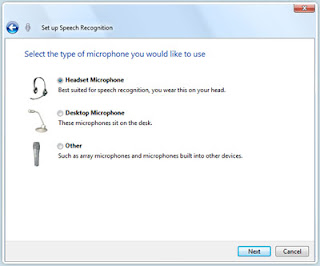
- First, there is a hardware problem. You need a good microphone. Avoid cheap microphones as they tend to collect a lot of background noise.
- Secondly create a voice profile and join the team to identify the speaker's voice and pronunciation. There is a speech training tutorial.
-> Click the Start button
-> Click Control Panel
-> Click Accessibility
-> Click Speech Recognition
-> Click To Speech Tutorial
- And finally, speak clearly and pronounce words carefully, not too fast or too slow.

Key features of speech recognition
Speech recognition is divided into the following categories:
- Multiple languages: Windows Speech Recognition in Windows Vista is available in eight languages / dialects: English, French, Spanish, German, Japanese, Simplified Chinese and Traditional Chinese.
- "How can I" help: If you say "How do I ..." do, or do, or find ... a task that is to be realized with the computer, the software will respond accordingly. For example, "How can I change my desktop theme?"
- Correction: One is able to fix incorrectly recognized words by selecting the alternatives provided for the sentence given or word, or the spelling of the word.
- Dictation: E-mails and documents from dictation, make corrections, and save your work.
- Adaptation: change and adaptation to the speaking styles and accents. The program learns and improves human computer interaction
- Command: This is the "Say what you see" property. It allows one to naturally control applications and complete tasks. Among these documents or launch applications, formats, save or delete documents.
- Disambiguation: ambiguous words and phrases can be solved with a user interface for a clarification. If something can be misinterpreted, software can clear.
As computers become more powerful, it would only be a matter of time before touch screens became more common and standard. While the mouse and the keyboard are not going away soon, other methods for manipulating information will be possible. Touch screens have been around, but the hardware technology had to be there to make is feasible. With the latest generation of hardware available, that touch technology now does exist, and Windows 7 has software technology to make that screen manipulation possible.
The Windows 7 Touch Interface
Here are touch screen features available with Windows 7.
Flicks: Their use is very common.Navigation and edit are two categories of flicks. An upward flick moves a page down, and a downward flick moves a page up. Use left or right flicks to navigate back and forward.
Tap and Double-tap: Touch and release to click. This is the most basic touch action. Can also double-tap to open files and folders. Tolerances are tuned to be larger than with a mouse. This works everywhere.
Pan: Touch and slide your finger on screen. This is similar to dragging with a mouse; icons around the desktop, it also moves windows, and selects text by dragging left or right, and so on.
Scroll: Drag up or down scrollable window content. This is the most used feature to use, as opposed to using the scrollbar.
Zoom: Touch two fingers together or apart to zoom in or out on a document. Use this when looking at photos or reading documents on a small laptop.
Two-Finger Tap: By tapping the screen with two fingers simultaneously it zooms in about the center of the tap or restores to the default zoom.
Rotate Touch: Two spots on a digital photo and twist to rotate it just like a real photo.
Press-and-hold: This is similar to the right click. Hold your finger on screen for a moment and release after the circle appears.
Press-and-tap: With a second finger just like you would click the right button on a mouse.
Paint: You can use Paint to draw with your fingers.
For a demonstration of Touch watch the video below:
All of this assumes that you have a touch screen monitor. Many are available. You can locate some at Nextag.
We’re not is Star-Trek territory yet, but the convergence of powerful hardware and powerful software makes this inevitable.
Many have wondered what was going to be the next big step in computing, since the last big one was the Internet. Going back to basics may be the next big thing but there has to be a reason to go back. If improving the user interface via touch does that, then this is a good first step
The Zune software takes advantage of new Windows 7 jump lists and you can easily access albums you've nailed your skip list and access Smart DJ stations. An option is also available Quickplay where you simply navigate to the Zune software on your start menu and the list expands, offering options to play their lists Quickplay. The Google Mini is also a great feature and some of you may be familiar with it when using Windows Media Player, which allows you to sort, change and pause / play the songs in the preview area bar Aero tasks to look
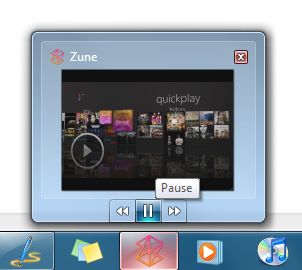
Another nice feature is the Zune makes it easy to reverse sync your music library copy to a computer. Something Apple is very strict and cautious about ....
Obviously Microsoft is expected to ensure that all products are compatible with their operating systems and software, but it seems they are trying to sell Windows 7 here, while emphasizing the fact that the Zune HD is optimized for Windows 7 . I do not blame them either, it's just another good thing that Microsoft has on its side with Windows 7.
What is also interesting is that Apple have quietly admitted that not all Mac users and iPhone iPod itself and iTunes have 9 fully compatible with Windows 7 as well. Even Apple and Windows 7!
Sources: CNET
The full version of Acronis True Image Home 2010 is $ 50, but no 30-day free trial so you can always sign up for trial on October 21 the day before the release of Windows 7 and uninstall it in November if no longer need ....
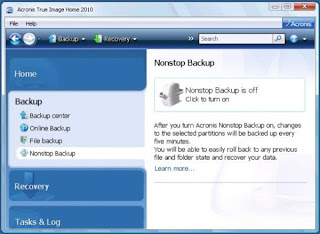
In addition to supporting the entire system, you can also choose to back up files or folders in particular. The software also lets you create bootable media for backup or recover the system using a CD or flash drive. If you only want to retrieve a few files from a backup, you can mount the backup file in a virtual drive and copy the same data using Windows Explorer.
The new software version adds some new features, including online backup which costs $ 4.95 per month for 25 GB or $ 8.90 per month for 50 GB, and no backup copies automatically scales up the changes every five minutes.
Source: CNET Crave
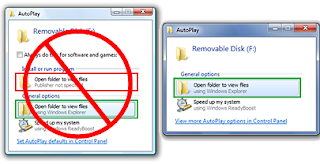
Microsoft pushed updates for Windows operating system that disables the autorun feature of non-optical devices. This update affects Windows XP, Vista, Server 2003, and 2008. Microsoft and disables the feature, which will be available soon, Windows 7 OS. The update was available voluntarily in August.
Autorun (autoplay and) was developed originally for the convenience of eliminating the need for users to navigate the media to the correct file to open. However, recently it has been exploited to automatically run malware and other software applications without the consent of annoying users.
Interestingly, the update did not cripple optical removable media (CDs and DVDs, that is) to implement automatic enforcement procedures. So companies such as U3, which manufacture their devices to represent themselves as CDs are not affected by the update.
In the past, Microsoft may have spoiled customers who are prepared to adopt new products due to implementation costs or security problems. Not this time, however, are urging businesses can save money in the long term and use a much better product. Especially make this request to customers who contract their own volume license for XP, they are entitled to the software update. One general manager of Windows Gavriella Schuster, put it bluntly: "Hey, it belongs., Implement it, and losing XP. Go ahead."
Many believe the widespread adoption of Windows 7 in companies critical to the success of the operating system. Most consider the clear advantages over Windows XP 7 provides no evidence brainer to make the change.
Remember when Windows Vista came out and said no to Apple users to upgrade to Vista because it was not compatible with iTunes (instead of iTunes was not compatible with Vista!)? Many users, including myself, had nightmares with iTunes in the first months of Windows Vista.
This time it seems that Apple is recognizing that most of the world uses Windows and not your OS, and iTunes is fully compatible with Windows 7. Not only that, but the latest version of iTunes 9 also adds a Jumplist Windows 7:
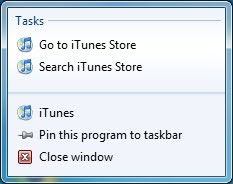
The jumplist not offer much in terms of functionality than sending customers to the iTunes Store to spend money, but at least it's a start and Windows 7 users can be sure that Apple is supporting the new operating system.
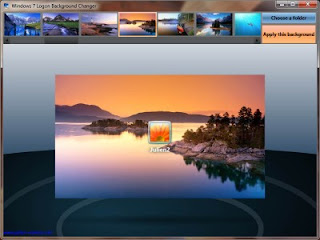
The program comes with an option to automatically resize images in a selected folder on the size of support so that funds can be used as logon of Windows 7. Processed images can be saved with a good balance between compression and image quality.
On 7 Windows user can select one of the funds available to the logon process for Windows 7. No system files are altered by the program and rights management are necessary only to create a folder and a password for initial registration.
Logon Background Changer Windows 7 is more comfortable than the previously reviewed logon changer Windows 7. The program is based on Windows Presentation Foundation which means it requires a decent video card to display the 3D animations smoothly. The software can be downloaded from the website of the developer.
One of my favorite things about Windows 7 is the introduction of the new Aero features. It is easy to learn to use these as gestures are natural for them and quickly begin using without hesitation. Nevertheless best of them is that they are really useful and really help increase the productivity of the operating system.
The reason I titled this post "How to enable and use Windows 7 Aero features" because it is the first time you install Windows 7 may not have the Aero features enabled.
It turns out that by default, Windows 7 is set automatically to adjust Windows Aero effects based on their experience index rating systems. If you have Windows 7 will have to run this by going to Control Panel -> System and Security -> System and make sure you have the drivers installed for your graphics card
Sometimes you can have only partial effects Aero. This may be because Windows cannot think your machine is powerful enough to run these effects without compromising performance.
If this happens to you, and you do not mind about a possible slight slowdown in performance that can force that can --
1.Go to Control Panel -> System and Security -> System
2.Click on Advanced system settings of the performance settings and then left.
3.In the Visual Effects tab you should see the option "Let Windows choose what's best for my computer" is enabled by default.
4.Below you should see a list of visual effects, some of which is controlled if you are not experiencing the full range of features Aero.
- Select the Custom option and then select any effects from the list below it. Click Applied and OK and you should have all the Aero effects enabled.
Now, what are these Aero effects?
Aero Peek:
What we are givens a preview of windows on a thumbnail without having to open them, simply hovering over the icon in the taskbar. Click one and you will be taken to the window, the also works with tabs in Internet Explorer which is very useful but unfortunately does not work in Firefox or Chrome yet
You can also move the cursor to the lower right corner of the screen to preview your desktop, click and you will be taken to your desktop
Aero Shake:
If you have many open windows on your desktop and you just want to see one, click and hold your window and Shake it! All other windows minimized, simply shake the window again and all the other windows restored.
Aero Snap:
One of the most useful features I use in Windows 7, if you click and drag a window to the top of the screen automatically maximize it. If you have two windows open, and want to see them side-by-side. Click and drag one to the right edge of the screen and the other left. They both automatically resized to fit the screen
Aero Flip:
This effect Windows Vista Aero, but not in XP. Start by pressing the Windows key and the tab at the same time. It will give a 3D effect that will allow you to "flip" between different windows
Here is a video I did on a walk through the features of Aero
Most netbooks * the absence of CD or DVD
* Laptop computers run Windows XP or Linux, neither of which are compatible with upgrade installations of Windows 7
As regards the number one problem, there may be a solution: Ina Fried Cnet reports that Microsoft is mulling over the idea of offering Windows 7 on USB flash drives for netbooks easier updates without connecting an external CD drive or DVD. As we demonstrated earlier this year, you can install Windows 7 from a USB key with a little trickery. Creating a version of Windows 7, which is easy USB key would make the process much easier for clean installations.
But what about Windows XP users who want an update netbook easy? Fried reports that Best Buy Geek Squad is considering the development of Windows Update Services 7.
Windows 7 as Windows Easy Transfer to move user accounts, email and data file systems from Windows Vista or XP, but there is a better solution, which also works with the programs? What's Linux netbook users? Any application or script that can at least get the data to Windowsland safely? We are looking for better suggestions to make the switch from Windows XP or Linux on a PC or other netbook to Windows 7 as painless as possible for non-experts. Think simple, think reliable, and struck a comment to pass along.
Networking in Windows 7 is based on the radical overhaul that occurred in Windows Vista. However, although some of the basic networking features in Windows 7 are similar to Windows Vista, many have improved networking features in Microsoft's latest operating system. And if you're moving from Windows XP, Windows 7 you'll find that network interface is a whole different animal than we have encountered before. Whether you're moving from Windows Vista or Windows XP, read onto learn new and better usually building blocks of Windows 7 networking.

Windows 7 improves the experience of the first network under Windows Vista, adding support HomeGroup
Connect to wireless networks
Windows 7 continues the automatic detection feature introduced wireless network in Windows XP and Windows Vista refined। When one or more wireless network detected but not connected to any of them, the five family-bar icon appears in the notification area with a coating starburst. Click the icon to display a list of wireless networks. Insecure networks are marked with the Windows Security shield. Click on a network to connect to it.
Connecting to an unsecured network
When selecting an unsecured network, a warning message। If you want to connect automatically, click the check box. Click Connected to complete the connection.
In the next dialog box, click the Public Network to configure the Windows firewall to block access your shared folders and resources
Dealing with the requirements Login
Some places with unsecured wireless access may require you to reach the website service provider and agree to the terms of service before using the connection। Windows 7 prompts you if necessary. Click the command prompt to open the browser and provide the necessary information.
A secure network connection
When connected to a secure, all you need do enter the network security key (password). You do not need to specify the encryption type (WEP, WPA or WPA2) and Windows XP.
Working with the network folder
The network folder can be opened from the Start menu when this option is enabled in the configuration of the Start menu or by clicking on the network from any Explorer window. Displays the network equipment and provides links to networks and shared resources (an enhanced version of Windows Vista Network and Sharing Center), add a printer, and add the wireless device. To view the shares on a computer on the list, double-click the computer icon.
Installing a network printer
To install a network printer, click the Add a printer on the network folder. Select Add a network, wireless or Bluetooth printer when prompted, and click Next. Select the printer from the list of shared printers and click Next.
If a printer driver suitable for use with Windows 7 is available, the printer is installed. If not, Windows uses Windows Update to search for a line of drivers. If Windows Update cannot find a driver, download and install the driver manually. If the Windows 7 is not available, use the Windows Vista. Before you cancel the Add Printer task, note the address of the network printer, as you must navigate to it if you perform a manual installation of the printer.
Network and Sharing Center
The Network and Sharing Center, originally introduced in Windows Vista, has been simplified in Windows 7. You can start it from a link in the network folder, or category of Control Panel Network. As with Windows Vista, the top of the window provides a graphical representation of the connection.
Then the connection diagram, network and sharing center shows the connection type and status. Windows 7 uses Home, Work, and Public to identify the type of network rather than the private and public terms used by Windows Vista. Here's how a PC connected to a home network through HomeGroup and a PC connected to a network to display its settings in Network and Sharing:
The back of the net of Windows 7 and Sharing provides links you can use to configure a new connection or network, connect to an existing network or create a manual HomeGroup resource sharing and network troubleshooting. This is a cleaner interface than that used by Windows Vista, which lists all the network options to choose from, if you need to use them or not.
Blog Archive
-
▼
2009
(28)
-
►
September
(20)
- Ready Set Windows 7
- Microsoft Security Essentials
- How to Integrate Winamp With Windows 7 Taskbar
- How to create a partition in Windows 7
- What's New in Windows 7
- Windows 7 Hardware Compatibility List
- nVidia Graphics Driver Windows 7
- Windows 7 Beta Exams Registration
- Using Speech Recognition with Windows 7
- How to Use Windows 7 Touch
- Zune HD works well with Windows 7
- Acronis True Image 2010 is Compatible with Windows 7
- Microsoft Disables the AutoRun Feature
- Microsoft Asks Businesses to Scrap Windows XP
- Is iTunes fully compatible with Windows 7 ?
- How to change Windows 7 Logon Background ?
- How To Enable And Use Windows 7 Aero Features
- How to Get Windows 7 onto a Netbook?
- Windows 7 Networks and Homegroups
-
►
September
(20)
Labels
- Aero (1)
- iTunes (1)
- NetBook (1)
- Network (1)
- Touch Screen (1)
- Wallpaper (1)
- Windows 7 Features (4)
- Windows 7 How To? (4)
- Windows 7 Update (1)
- Zune (1)


